【React Native】【Expo】Expoでプッシュ通知を送る
React Native + Expoでプッシュ通知を送る方法をご紹介します。
公式で
it's almost too easy.
と書かれている通りで、実装はとても簡単です。
ちなみにExpoベースのアプリでプッシュ通知を送る場合、このExpo公式のプッシュ通知を使う以外方法はありません。
例えば、Firebase Cloud MessagingやAmazon Simple Notification Serviceなどのサービスは使えません。
(2018/5/2訂正) Expo SDK 27からFirebase Cloud Messagingがサポートされるようになりました。
Expo SDK v27.0.0 is now available – Exposition
プッシュ通知の実装
手順は大きく3つあります。
1. Expoのプッシュトークンを自分のサーバーに送る
2. Expoのプッシュ通知APIを叩く
3. 届いたプッシュ通知のハンドリング
といった感じです。
1. プッシュトークンを取得して保存
端末を特定するためのプッシュトークンを取得します。
このトークンはExpoが発行するもので、インストールする度に変わります。
トークンを取得したら、自分のサーバーで保存しておきます。

import { Permissions, Notifications } from 'expo';

const PUSH_ENDPOINT = 'https://your-server.com/users/push-token';

async function registerForPushNotificationsAsync() {
  const { status: existingStatus } = await Permissions.getAsync(
    Permissions.NOTIFICATIONS
  );
  let finalStatus = existingStatus;

  // パーミッションがとれてないときだけ聞く
  if (existingStatus !== 'granted') {
    const { status } = await Permissions.askAsync(Permissions.NOTIFICATIONS);
    finalStatus = status;
  }

  // パーミッションを許可しなかった場合はreturn
  if (finalStatus !== 'granted') {
    return;
  }

  // Expoプッシュトークンを取得
  let token = await Notifications.getExpoPushTokenAsync();

  // 自分のサーバーにExpoプッシュトークンをPOSTする
  return fetch(PUSH_ENDPOINT, {
    method: 'POST',
    headers: {
      Accept: 'application/json',
      'Content-Type': 'application/json',
    },
    body: JSON.stringify({
      token: {
        value: token,
      },
      user: {
        username: 'Brent',
      },
    }),
  });
}
2. ExpoのプッシュAPIを叩く
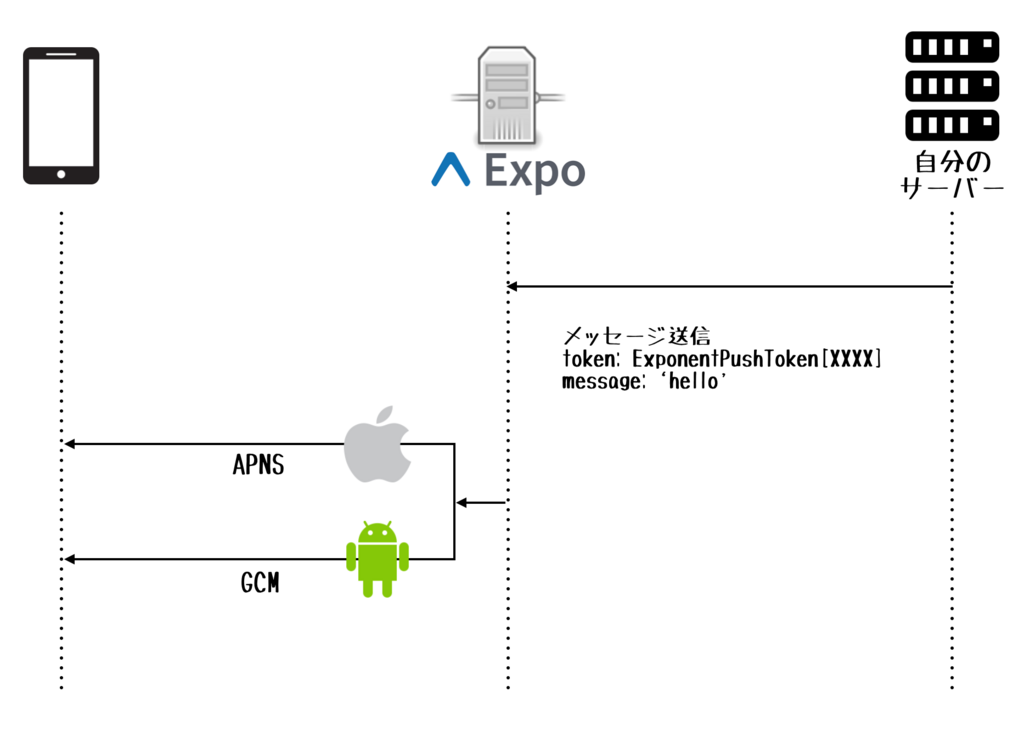
先ほど取得したトークンと送りたいメッセージを、Expoのプッシュ通知APIにPOSTします。
iOSかAndroidかはExpoサーバー側で判断してくれます。なので開発者は、iOS/Androidを特に意識せずAPIを叩くだけでよいのは楽チンでいいですね。

具体的には、
https://exp.host/--/api/v2/push/send
というエンドポイントにPOSTで、以下のようなJSONを送ります。
[{
  "to": "ExponentPushToken[xxxxxxxxxxxx]",
  "sound": "default",
  "body": "Hello world!"
}, {
  "to": "ExponentPushToken[yyyyyyyyyyyy]",
  "badge": 1,
  "body": "You've got mail"
}]
rubyだとこんな感じで実装できます。
        messages = [
          {
            to: 'ExponentPushToken[xxxxxxxxxxxx]',
            body: "hello",
          },
          {
            to: 'ExponentPushToken[yyyyyyyyyyyy]',
            body: "hello",
          },
        ]
        end
        conn = Faraday.new(:url => 'https://exp.host/--/api/v2/push/send')
        conn.post do |req|
          req.headers['Content-Type'] = 'application/json'
          req.body = messages.to_json
        end
        response = conn.post '/push/send'
3. 届いたプッシュ通知のハンドリング
iOSではアプリがフォアグラウンドにあると、通知欄にプッシュ通知は表示されません。
なのでアプリ側でハンドリングしてあげる必要があります。
よくあるのは、アプリ側でハンドリングして自前の通知バーを出す、などでしょうか。
import React from 'react';
import {
  Notifications,
} from 'expo';
import {
  Text,
  View,
} from 'react-native';

// 先ほどの説明にあるregisterForPushNotificationsAsyncを参照
import registerForPushNotificationsAsync from './registerForPushNotificationsAsync';

export default class AppContainer extends React.Component {

  componentDidMount() {
    registerForPushNotificationsAsync();

    // アプリ起動中に受信、選択されたプッシュ通知をハンドリング
    this._notificationSubscription = Notifications.addListener(this._handleNotification);
  }

  _handleNotification = (notification) => {
    if(notification.origin === 'selected'){
      // バックグラウンドで起動中に通知がタップされたとき
    }else if(notification.origin === 'received'){
      // アプリ起動中に通知を受け取った
    }
  };

  render() {
    return (
      <View>
      </View>
    );
  }
}
補足:プッシュ通知の証明書は?
最後にここまで読んで、
「プッシュ通知の証明書とかはどうなってるの?」
と思われるかもしれません。
以前に書きましたが、EXPOではプッシュ通知の証明書もビルド時にEXPO側で管理してくれているので、開発者は意識する必要がありません!(これはとても楽♪)
以上になります。
以前のプロジェクトでは自前でAPNS、GCMを送信する仕組みを作っていましたが、それに比べると格段に楽になったと感じています。
是非お試しください。